


Skid steer tracks can partially or entirely come off the undercarriage during operation.
De-tracking or derailment is common among compact track loaders. Although the first time might be scary, it’s not the end of the world.
In this post, we’ll cover the following:
- How to avoid common problems with skid steer tracks.
- How to identify derailment quickly.
- How to put a track back on a skid steer.
- Proper maintenance to minimize derailment from happening.
If you throw off a track and damage it, we’ll also cover how to install rubber tracks.
Table of Content
Common Factors Causing Track Derailment

Several factors can cause rubber tracks to run off: environmental, operational, lack of maintenance, etc.
Regardless of the reason, derailment can cause the bottom rollers or the sprocket to:
- Cut the track rubber body, exposing the inner cables.
- Snap the inner cables due to excessive pressure.
- Bend the drive lugs.
- Tear the rubber apart from the drive lugs, eventually producing rust due to moisture.
Let’s break down some factors that can cause track derailment.
Due to Job Site Conditions
Chances of derailment increase when working on uneven terrain, such as rocky ground, or those with transitions (level differences), curbs, and ledges.
Traveling over rocks or stumps can cause tracks to flex and twist excessively. As the flexed track keeps rolling, the drive lugs can go out of place, either in or out of the sprocket-rollers-idler plane. Also, hitting obstacles with enough force can cause an immediate derailment.
Mud, dirt, gravel, sand, or snow packing in the undercarriage gradually pushes a track out of alignment until it comes off. Frozen material will increase the chances of derailment since it will act as a rock getting between the drive lugs and the undercarriage components.
Due to Lack of Maintenance
Lack of maintenance can cause rubber tracks to overstretch or be loose. Both scenarios can cause derailment.
Not cleaning the packed soft material—dirt, grass, snow— out of the undercarriage at the end of the work shift, especially in winter, will overstretch the track.
Sprockets with worn teeth have a higher pitch. They won’t engage with the links correctly, causing the track to lose tension.
Worn-out bottom rollers and idlers can cause derailment for several reasons:
- Wobbling bogies lead to uneven wear and the track slipping off its normal path (track not centered), especially when the machine turns or operates on uneven terrain.
- Worn bearings can compromise load distribution, creating uneven pressure on certain track parts.
- Excessive vibration and instability in the track system—particularly during tight turn maneuvers or when working on rough terrain—increase the risk of tracks coming off.
Due to Bad Operation Habits
Besides driving over rocks, debris, curbs, or tree stumps, another bad habit among rookie operators is doing tight turns (one track rolling forward and the other backward or stationary).
Doing tight turns on soft terrain makes the material accumulate in the undercarriage.
Using the same technique on a surface with high friction, like asphalt or concrete, causes the tracks to “stick” to the ground while the machine’s body rotates above them. The resulting shear forces can push the track off, especially if the operator turns aggressively.
Due to Low Quality
Cheap rubber tracks won’t have the right size to fit or engage correctly with the sprocket, causing the track to loosen and run off the undercarriage.
Besides improper fitment, the low-quality materials and poor manufacturing processes of cheap skid steer tracks increase the risk of derailment because they slip, overstretch, bend, and vibrate excessively.
Regardless of the upfront cost, investing in the right tracks will boost efficiency and reduce downtime in the long run.
At Fortis, we have the best aftermarket replacement tracks to reduce derailment significantly. What makes our products so unique? You’ll find the answer in our article “Best Skid Steer Rubber Tracks to Reduce Downtime.”
How to Identify a Thrown-Off Track

Before we move on to the steps to fix a thrown track, you must learn how to identify when it happens to avoid further damage to the track and the undercarriage components.
Unusual thumping or flapping noises often indicate that something’s not right with your track— it’s like walking with a loose shoe.
If your equipment suddenly feels like it’s fighting you when you try to turn or it’s not responding as crisply as usual, this could be a sign of a thrown track.
Excessive vibration can indicate a track is loose or has come off entirely.
A thrown track will often lose tension, causing noticeable sagging.
Tools to Put Back a Skid Steer Track

Overall, the tools you’ll need to put a track back on a skid steer are:
- To keep the equipment off the ground:
- Wooden blocks (recommended).
- Bottle jack.
- To remove the track adjuster grease valve:
- Regular wrench.
- Ratchet with a deep socket.
- Ratchet extension (optional).
- To remove, realign, or install the track:
- Pry bar:
- Regular.
- Extendable (optional).
- Trackbar system (optional).
- Pry bar:
- To adjust the track tension:
- Grease gun—manual, air, or electric (recommended).
Some of the tools above are optional, though they can make the job easier, like the extendable pry bar and the Trackbar System. We prefer others because of safety or efficiency reasons.
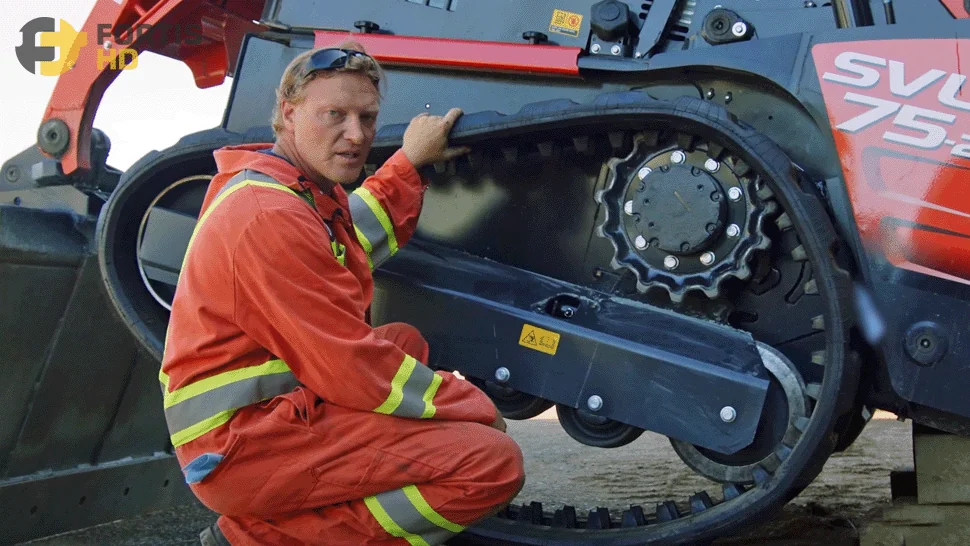
How to Put a Track Back on a Skid Steer

Although focused on a Kubota SVL 75, the steps below apply to most machine brands and models. Check your owner’s manual for specific tool sizes.
If you need to replace your tracks, we recommend having someone to help you since rubber tracks can weigh up to 500 lb and be quite heavy to handle by one person.
Lift the Skid Steer
If replacing your tracks, park the bobcat on a stable and flat surface.
Put some wooden blocks of varied sizes under the rear part of the equipment near both tracks. Leave a small gap (1” – 1/2″) between the blocks and the frame and put them under a solid part. Otherwise, you could bend a belly pan or cause some other damage.
Using blocks rather than bottle jacks is because hydraulic jacks can fail in several ways:
- Overloading.
- Lateral forces.
- Wear and tear.
- Improper positioning.
Next, flip the bucket down and push it into the ground. Lift the front of the machine with the bucket. The back end will pivot on the blocks, keeping the whole unit off the ground.
Flipping down the bucket will let you lift the machine more, use the strong axis of the bucket’s cross-section, and reduce stresses on the quick-attach coupler—if equipped.
Tilt the bucket a bit forward to avoid sliding off the blocks as you lift the equipment.
Relieve the Tension
Relive pressure from the grease fitting to loosen the track.
Remove the cover of the grease valve compartment on the undercarriage frame and turn the grease valve counterclockwise with a deep socket ratchet to loosen it.
We prefer a deep socket ratchet because some models have the grease valve way back, so you won’t reach the valve or get a good angle to use a manual wrench.
Optionally, you can add an extension to get the ratchet further out from the track frame, making this step easier.
As you loosen the valve, grease will start coming out, and the track will also get looser. To help suck in the front idler, whether because the machine is old or to speed up the process, you can step on the bottom of the track.
Remove the grease nipple and put it somewhere safe.
In winter, if you can’t pull in the idler because the grease is too cold, you can also put a bar between the top of the sprocket and the track. Tell the operator to fire up the skid steer and slowly turn the track backward. As the sprocket pulls the bar, it will tighten the track, pulling in the idler.
Realign or Remove the Rubber Track
If you need to put back a derailed track, pry and push with a bar until you pop it back on whatever component it ran off.
If you need to replace an old track, put the bar back on the sprocket, but this time, as it goes around, pry the track to help it walk itself off the sprocket.
Speaking of pry bars, some models have extendable handles and pivoting heads. Extendable bars are not a must-have but will make removing tracks easier, depending on your space.
For those of us servicing skid steers outdoors, a regular bar, like the one we offer at Fortis, is enough.
Install the New Track
If you can use another machine to put the track on the sprocket, do it. Otherwise, brute force is the way to go.
No extra machine? Then, tell the operator to lower the skid steer, put the track as much as possible on the front idler and sprocket, and lift the machine again to bring up the track for you.
Pry and push the track on the sprocket, front, and rear idler until you get the links up against each component.
Because new rubber tracks are stiff, you might need to kick the track to pop it on the rear idler.
There are optional tools, like the Trackbar System, to help you put back or install rubber tracks quickly and easily. The Trackbar System consists of three steel J-shaped clips you attach to the grooves between treads. As the track turns and the bars go against the idlers, they push the drive lugs into position.
Adjust the Track Tension
Clean the grease valve thoroughly before reinstalling it to avoid dust and debris entering the track adjuster system.
Put back the grease nipple. Use the grease gun to tighten the track until you don’t see much sag at the bottom or the top.
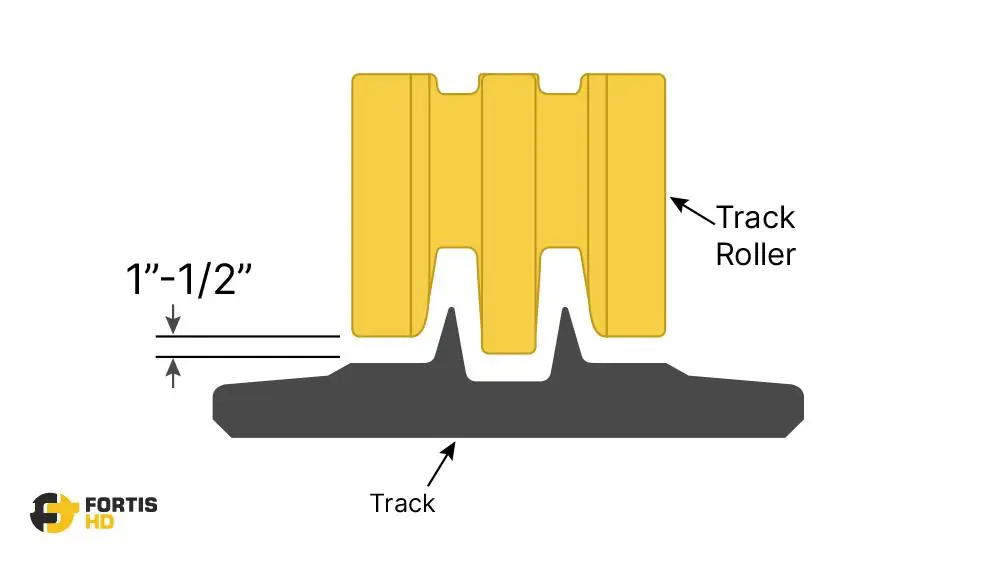
Always refer to the manufacturer’s specifications for the right tension. However, as a rule of thumb, the distance between the middle bottom roller’s flange and the track’s inner bottom side should be 1 – 1/2″.
Run the track forward and backward for a few seconds, and check the sag at the bottom of the track again.
You can also check the tension of a rubber track with the equipment on the ground. We’ll tell you how to do it in the next section.
Brand-new tracks will break in when you install them. During the break-in phase, the tracks settle and adapt to the undercarriage and the working conditions. We like to keep the tension a bit tighter because tracks will stretch and get loose after 4-5 hours of running.
Tips to Reduce Track Derailment
Keep your tracks properly tensioned.
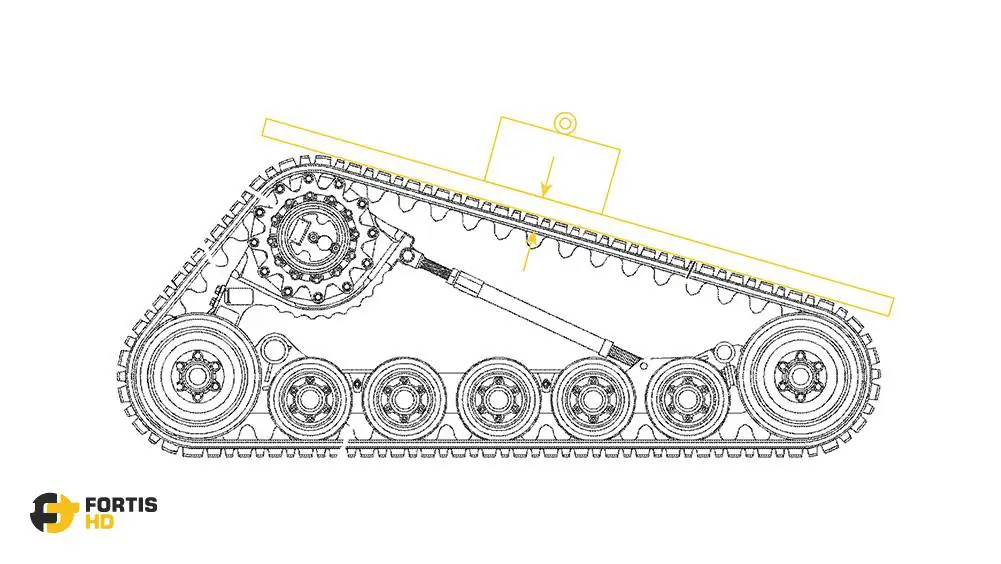
To check the tension with the skid steer on the ground, park the machine on a leveled surface and place an approximately 100 lb (45 kg) object between the sprocket and the front idler. Place a straight edge across the drive sprocket and idlers.
Measure the distance between the bottom of the straight edge and the top of the track. The distance should be around 0.5” (12 mm).
You can also use a string instead of a straight edge. Lay the string on top of the track across both idlers and keep it tensioned. As before, the distance between the string and the track should be around 0.5” (12 mm).
Do regular inspections of the undercarriage. Pay special attention to the sprocket teeth and the bearings of the rollers.
If the sprocket teeth are razor-sharp, you must replace them. A good practice to extend the useful life of the sprockets is to swap them along with the tracks from time to time to make them wear more evenly.
To check the condition of the bearings of the bottom rollers, try to wiggle and turn them by hand. A wobbling and easy-to-turn roller has its bearing and seal worn out or damaged.
Also, look for bent or missing lugs and frequently grease the torsion axles—if your machine has that feature.
Finally, drive your skid steer correctly.
Counter rotate when required. Otherwise, turn gradually or use the three-point turn technique.

Operate up and down slopes rather than across.
When ascending an incline, never change direction at the base of the incline.
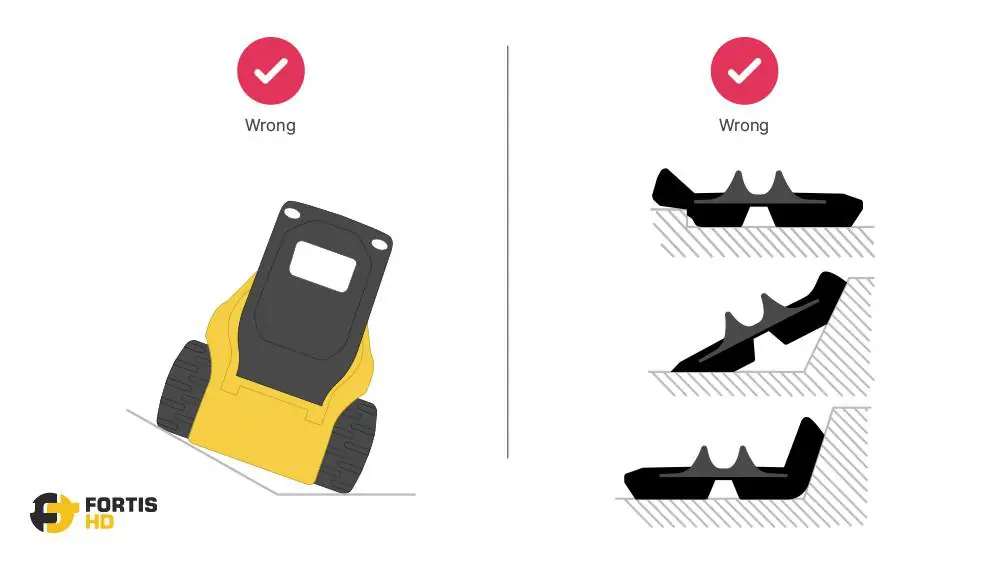
Always avoid driving the machine with one track on a different surface than the other track or with one track partially on an incline. Make sure both tracks are on stable, firm surfaces when in motion.
Entering and exiting ditches can cause abrupt shifts in weight and tension on the tracks. These sudden shifts can lead to a track becoming loose and derailing.
Wrapping Up
Skid steer track derailment is quite common and relatively easy to fix. However, it can also damage your tracks or your undercarriage.
Reduce the chances of de-tracking with good driving habits, preventative maintenance, and especially high-quality tracks like the ones we offer at Fortis.
To leave skid steer track repairs in the hands of professional technicians, you can hire expert heavy-duty mechanics and operators from Tekamo HD or Rent1USA.

For more step-by-step heavy equipment maintenance and repair guides, visit the Fortis HD blog.