


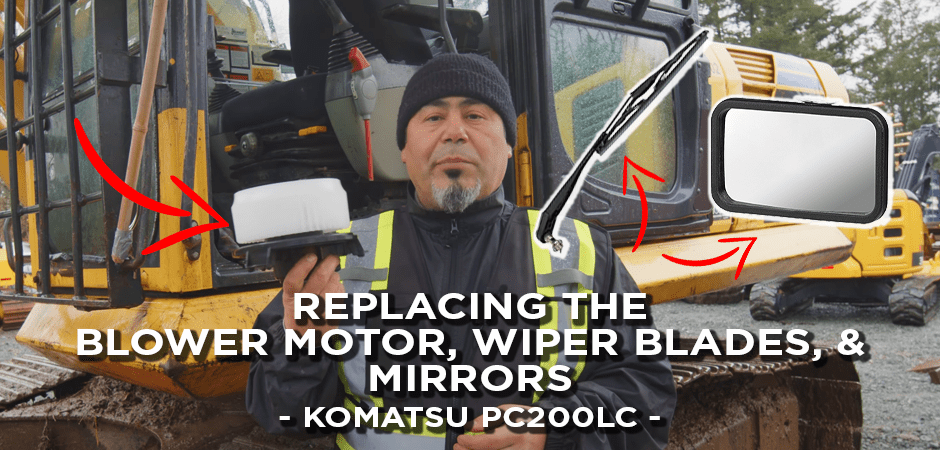
Today, we’re going to show you how to replace the fan motor in your excavator’s air conditioning unit, as well as how to install new wiper blades and mirrors.

We’ll walk you through each step of the process, and provide some helpful tips along the way. By following these instructions, you’ll be able to tackle these tasks on your own excavator in no time!
For reference, we’re doing this on a Komatsu PC200LC Excavator.
Related Parts
Table of Content
Step 1: How To Replace AC Fan Motor
You may want to read our earlier post on how to troubleshoot heating problems before concluding you need to replace the fan motor on your A/C unit.
To replace the fan motor on the AC unit, you’ll need to remove the light gray and dark gray covers.
Before that can happen, you’ve got to take off the two storage cubbies on the sides to access the two covers. Loosen up the bolts and the cubbies should come right off.

Next, loosen the bolts on the two gray covers so they can also come off.
You might need to dust it off. When dust is left to accumulate, it can affect the functionality of the motor and other components.
Test the new fan first to see if it works before removing and replacing the AC fan motor.
Disconnect the cable on the old motor and plug it into the new motor. Turn on the ignition and test it out at different speeds. If the fan works, go ahead and remove the old motor.
There are three screws on the sides you must remove before the cover can come off. Use a ratchet to unscrew.

It should not take long to unscrew them (unless they were previously over-tightened). There will be some screws you can’t see.
Before putting in the new blower motor, note where those three holding screws were located. Also, check the seal around the circumference of the new motor is perfectly in place and that it’s not ripped.
Now you can install the new blower motor for the AC unit.

Put it in the exact place where the old one was, then return the three screws in place.
Make sure you don’t tighten any screw or bolt until they’re all in place. Sometimes you may need to wiggle the component a little bit or re-align one bolt. That becomes harder when you’ve already tightened them because then you’ll have to remove them all and start over.
Step 2: Test the Cabin Fan
Once you’ve connected the blower motor, test it one last time.

Remember to test all the different speeds as you listen to it to ensure it’s running perfectly.
Reassemble everything and put the panels back when you’re finished.
Step 3: Clean the Cabin
Before you move to the next task, take this opportunity to clean up the cabin.

We recommend using the Spray Nine cleaner. It removes grease, grime, dust, dirt, and fingerprints and cleans all the marks. Or Simple Green is another great cleaner.
You can also do other cabin maintenance like replacing the cabin light or changing the cabin air filter if required.
Step 4: Replace Wiper Blades
There are two little screws on the arm that need to be removed so you can replace the wiper blades. Because they’re a little bit difficult to get to, just pull off the whole arm and work on a bench.
Use a number two Phillips tip screwdriver (if you have one) to unscrew the bolts holding the wiper blade in place.
If those screws are a little tight, be careful not to use excessive force or you might strip the head as you struggle to unscrew it.
Don’t lose the screws! Put them someplace safe until you need them again.

Now you can screw the new wiper blade onto the arm.
When you’ve replaced the wiper blades you can reinstall the arm onto the excavator where you initially removed it.
Make sure to properly align it and test it to see if it’s working before you finish.
Step 5: How To Install a Rear View Mirror & Side View Mirror
Our PC200LC Komatsu excavator has two different styles of mirror mounts:
- Jaw-type bracket; and
- Bolt and pivot type
You can tell which mount type it is by looking at the back of the mirror.
For mirror installation, you’ll need both the rectangular and the circular mirror.

Install Rear View Mirror
The rear view mirror is the rectangular mirror.
You may want to bring the holder down to your arm’s level so it’s easier to install it.
When you are installing the mirror, don’t let it stick out too far. Position it at a distance and angle that allows you to see what’s behind you when you’re sitting in the cabin. Excavators move quickly and spin around, so visibility is essential.
Careful not to overtighten the screws too much, you still want to be able to manually reposition the mirror.
Once you’re sure of the viewing angle you can raise the holder back up.
To properly test the viewing angle you might need someone to sit in the operator seat, or you can place an easily visible object behind the excavator and see if it’s visible in the mirror when you’re in the cabin.
Give the mirror a wipe-down so it’s nice and clean.
Install Rear View Mirror
The round, convex mirror, will be installed on the side of the excavator.
There will be a bracket for you to mount the mirror onto.
Position the side-view mirror properly so the operator can view the side of the machine and what’s next to them.
Again, test the viewing angle by getting someone to sit in the cabin or placing an object next to the excavator.
Clean the mirror of any smudges or fingerprints and you’ll be all done.