


It’s common to have trouble with the excavator ignition switch (especially during winter). If the ignition switch on your excavator fails, it can cause significant delays and even cost you money. But if you’ve been wondering whether you can replace an ignition switch yourself then you’re in luck, because we’re going to teach you how.
Replacing an excavator ignition switch may seem like a daunting task, but it can be done quite easily. In this blog post, we will walk you through the replacement process step-by-step. So if you are experiencing problems with your ignition switch, whether you’re a beginner or an expert, this blog post is for you!
Related Parts

Table of Content
Step 1: Troubleshooting
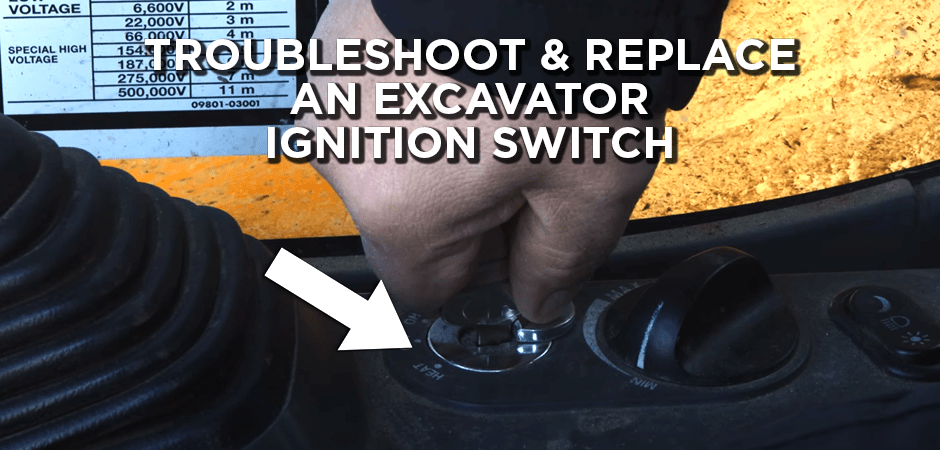
Excavator won’t start — just clicks? Or maybe it’s feeling stuck? Either way, let’s diagnose to make absolutely sure it’s a problem with the Komatsu ignition switch.

Put the master key into the ignition switch and see if the key is actually going down and turning smoothly.

If it’s not moving easily, there could be some parts inside or little pieces of metal that have fallen apart. Maybe the spring is displaced, not allowing the tumbler to twist inside the ignition housing.
You can test it by spraying lubricant on the key (on both sides) and try putting it into the excavator ignition switch.

If it still doesn’t work, then it’s definitely broken.
There isn’t much point in trying to repair your Komatsu ignition switch. It’s easier and quicker to replace the whole thing.
Step 2: Disconnect The Battery
Always make sure the excavator is properly parked before you start work. Sometimes the operator might leave the attachments suspended in the air, which is dangerous for the machine and the people around it.

The first step is disconnecting the battery and removing the power from the electrical circuits before pulling out any electrical or ignition parts.
Disconnect the ground using a 13mm wrench. Be cautious when disconnecting. Remember you’re working with the ignition switch, so there will be a live power or grounding circuit for the battery relay.
You want to ensure everything is disconnected and the machine is de-energized.

Step 3: Pull Apart The Console
Once you remove the ground strap, you can pull apart the console.
To pull the console apart easily, start by pulling off the boot on the joystick or the operator control. It should pop off right away.

Lift the cover out of your way to reveal the bolts.
The console on a Komatsu excavator tends to be a little tighter than other excavator brands, so you may need to use a wrench to remove a couple of the screws. Take a small wrench and remove the two 10mm bolts. You may need to hold the cover off to one side, so it does not get in your way. Place the bolts and washers aside (perhaps store them in an ashtray) where you can’t lose them.

Wiggle the cover a bit to see if it’s loose enough, and then there is no need to remove all the bolts.
Remove the throttle dial and put it in the ashtray or cup holder if your machine has one. Everything should come right off from there, and you should be able to push the joystick booth through the cover hole. Once removed, set the cover aside.
Try removing the key switch at this point to see if it will come off.
If it doesn’t, don’t force it. Just move to the next step and remove the side covers.
Step 4: Accessing The Ignition Switch
So where is the ignition switch located? Removing the side covers will make getting to the ignition switch much easier. Using your 10mm wrench, loosen the screws on the side.

Remove the joystick if needs be to access the excavator ignition switch. Because you don’t know how long those wires are, you may also have to pull out some more screws and remove the back cover. The bolt heads are all 10mm, so you’ll only need to use the 10mm wrench to crack them loose.
With the covers out, you should be able to reach the excavator ignition switch.
For most people, the biggest hurdle from here is figuring out how to disconnect the switch, mainly because it’s hard to reach it. Use some side cutters to cut off the wires.
Step 5: Remove The Old Ignition
Next, put on your gloves, and remove the old ignition.
On our Komatsu PC200LC, it was wrapped in cloth. If your machine has that too, you’ll need to unwrap the fabric to reveal the ignition. Usually, this cloth is made of fiberglass so wearing gloves is essential.
If you’re indoors, wear a mask so that you don’t breathe in the particles from the fiberglass cloth.
Be sure to keep the cloth! After reconnecting the wires on the new switch, you’ll have to wrap it the same way the old one was.
Step 6: Replace The Excavator Ignition Switch
You’ll notice the ignition is a little tight, so pull off the clamps to loosen it and change the wire over to new connectors.
Massive bolts hold the two little clamps, pull them off, and put them someplace safe like the cupholder.
Before you remove anything, make sure everything is identical.
On a Komatsu excavator, everything is marked so you shouldn’t have any problems even if you choose to disconnect it all. Just refer to the markings when reconnecting.
However, it’s best practice to do this one by one to ensure you do it the right way and avoid losing track of any of the lines.
If the seating area is tight, you may want to use an extra-long screwdriver for better reach.
Start by replacing any of the terminals but make sure you replace the “B” (battery power) as the last one. Unscrew carefully and take care not to lose the washers.

Once you’ve replaced them all, make sure they are tightened and well-secured. Rewrap the cloth around the switch, and put it back in. Replace the clamps you removed earlier.
Step 7: Test The Ignition
Before you put the covers back, test whether the ignition is working. Reconnect the battery and put the excavator ignition switch back in place.
Put in the key, turn on the ignition, and wait for a clicking sound. That’s your clue the heater is working okay.

Hold it for a few seconds, then put it in the run position.
Everything should be working normally now.
You can now proceed to put all the covers back on and then do a final re-test but your machine should be ready to go.