


Cable harnessing is an important step in keeping your wires secure from the constant rubbing caused by the abrasions and vibrations during motion. It is also important in lowering the risk of electrical fires caused by short outs.
Cable harnessing is a pretty straightforward 6-step process that should take you under an hour to complete. If you are thinking of doing it but don’t know how to go about it, here’s a detailed step-by-step guide on how to assemble a cable harness in any heavy-duty equipment.
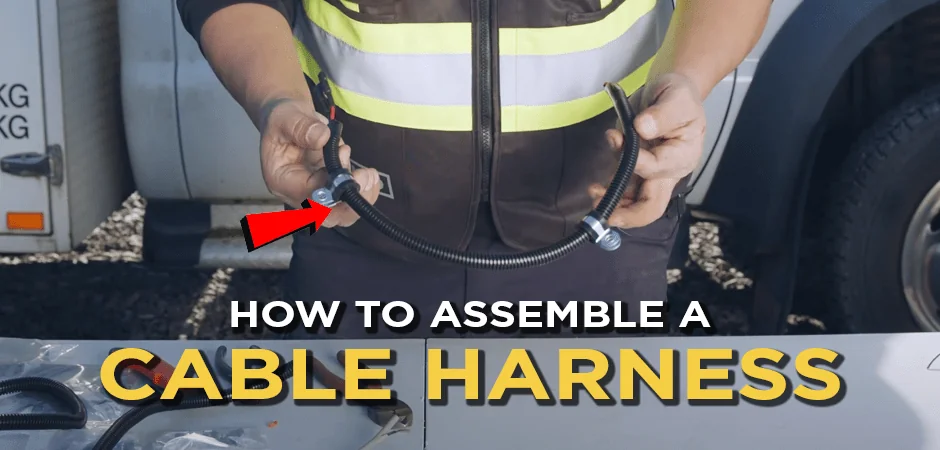
How to assemble a CABLE HARNESS - electrical wiring for heavy equipment repair
Step 1: Gather What You’ll Need

The first step is to gather everything you’ll need obviously. So here’s a list of the tools and parts you’ll need to complete the job.
- Red 16 gauge wire
- Black 16 gauge wire
- Blue female spade connectors to be used on the ends of the wires
- Sealable heat shrink
- Cable loom (hard cable wrap)
- Electrical tape
- Mounting clamps (P-clamps)
- Electrical crimping pliers
- Side cutters
- Cable splicing tool (usually part of the electrical crimping pliers)
- Box cutter
- Butane soldering torch (can also use an electric heat gun)
Step 2: Measure And Cut The Wires

First, get a measurement of the red and black 16 gauge wires to know how much of the wires you will need. Then cut them a little bit longer than the original length just to give you some working allowance. About six inches longer should be okay. You will use the red wire as the positive and the black wire as the negative. Some manufacturers use black for both negative and positive, while others use different colors to differentiate.
Related Parts
Step 3: Strip The Ends And Attach The Spade Connector
Take the black wire and strip off about half an inch of the insulation at one end of the wire using a splicing cutter. If you have a more specialized cutting tool that will work better than the splicing cutter you could use that; otherwise, the side cutter of the splicing tool will get this job done perfectly.
Be careful when stripping off the insulation. You only want to cut the insulation part and not cut through to the wire. So ideally, you’d be wearing it out loosely, then pull off the insulation all at once.
Take the spade connector and push the end of the wire through. Only push through the section where you removed the insulation. If the spade connector is a little bit long, you can cut off some more insulation to make it fit. Once you are certain it fits, take your crimper and crimp the spade connector. Make sure it’s tight enough so that it doesn’t come off. There shouldn’t be any movement between the spade connector and the wire. Using the second small crimp size will ensure it’s tight enough.
Now do the same to the red wire-cut off the ends, attach the spade connector and crimp. Give the connector a pull to make sure it’s nice and tight.
Step 4: Heat Shrink The Spade Connector
Now to make sure that the connector doesn’t short out to any ground or positive wire, you’ll want to put a little bit of heat shrink around the outside of the spade connector using the butane torch.
Heat it first so that it squeezes up against the spade connector. You should see it shrinking until it’s nice and clean. The heat shrinking will make sure that if anything touches the connector, it won’t short out. It will serve as a little insulator.
As you apply the heat, make sure you don’t apply too much heat because this heat shrink comes with an internal sealant, so if you heat it too much, it’ll melt, and it could create issues for you because it acts as an insulator as well.
So only heat up the end a little bit, just enough so that it shrinks. Towards the back of the connector (the part from the connector and the wire), you can heat it up a little more until you see something a little gooey come out. That’s the little sealant that’s in the spade connector.
To avoid overheating, you can definitely use a lighter in case you don’t have a butane torch. Bit and torches might be a little bit expensive. They range between $60 to $70, but they can get the job well done when you’re out in the field.
Make sure also to heat shrink both the red and the black wires.

Step 5: Loom The Wires
The next step is to insert the wire into the loom. To keep the loom from moving around on the wire or the wire from moving around the loom, cut a little piece of tape and tape a few rounds near the end of the wire. Just about half an inch from the sealed connector. Leave a small piece of the tape for wrapping around the loom to prevent the wire from sliding.
Because the loom is split, it should be easy to slide the wire inside. Start with wrapping the remaining tape around the loom until it’s over, then push the taped wire inside it.
The loom keeps the wire from hanging and helps protect the wire from any scuffing or rubbing. Because the truck is driving around, it’s mobile, so there’s always movement in there. You don’t want these wires rubbing on the box or anything external because it could short out the ground, and this could create a whole new issue altogether.
So once you’ve run the entire wire through the loom, cut it off to length and strip off the ends. From here, you should be ready to mount it.

Step 6: Mount The Loomed Wires
To mount the cable harness, you will first need mounting clamps to secure the looms. The clamps will make sure that it’s mounted securely so that it doesn’t get caught on anything, especially because the wire is going to be at the top part of the equipment. Mounting also makes it look neat and professionally done and prevents it from rubbing against surfaces.
![]()
Want to learn more about heavy equipment?
Get all your questions answered on our Heavy Equipment FAQs article.