How Our Vibro Impact Tie Rod Separator Saves You Time and Money
Written by Luis Montes Updated On June 2, 2024

How do you tackle seized tie rods? Propane and PB blaster? It works, but it’s not efficient.
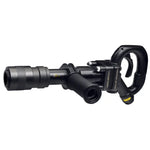
At Fortis, we like efficiency as much as we do effectiveness, so we want to show you a better way to break loose frozen tie rods: the Mueller Kueps Vibro Impact Tie Rod Separator.
Let’s compare the unseen harm of the typical heating technique vs this innovative vibro impact tool.
The Common Technique to Separate Seized Tie Rods

Most people loosen tie rods by applying heat with a blow torch for about 5 minutes or more—up to 15 minutes.
Although heat works, it also damages the connection.
Heat weakens the metal by altering its mechanical properties, and the thermal expansion also damages the thread geometry. You can also damage neighboring parts like rubber dust boots or wire looms.
Some guys apply penetrating oil right after heating up the tie rods, quenching the piece, which is even worse.
Quenching leads to the formation of cracks and makes the steel more brittle—more prone to fracture. Brittle steel parts will fail prematurely under constant loads and vibrations, like those in the steering and suspension systems.
An alternative method to break loose tie rods is vibration.
The Tie Rod Separator

If you won’t replace your tie rods but rather separate them for maintenance or to check something else, then forget about a blow torch.
The tie rod separator is a concave bit that fits the round section of the outer tie rod. It’s one of the accessories available for the Vibro Impact Air Hammer, the pneumatic tool we recommend in our guide on choosing a heavy-duty air hammer.
How the Bit Works
The Vibro Impact Hammer delivers 2,500 blows per minute, but instead of pounding, the tie rod concave end fits and vibrates the piece at a high frequency, loosening the connection.
The high-speed movement fractures the rust bonds and reduces friction by dislodging the threads.
The tie rod separator is even more effective with penetrating oil since vibration helps work the lubricant deeper into the threads.
How to Use the Tool to Separate Stuck Tie Rods
Here’s a brief step-by-step guide to separate tie rods.
First, mark the exposed threads, the jam nut, and the inner tie rod. The marks help you know the position of the nut in relation to the rest of the parts so you can match them up when you put them back together.
You can also count how many exposed threads you have. It’s an indicator of how far you must screw the tie rod to get it in the same position as before.
Break loose the tie rods (inner and outer) BEFORE removing the outer tie rod end from the knuckle so the whole piece—inner + outer tie rods—won’t flop around while trying to break it loose.
Put the concave bit horizontally—as much as possible—against the outer tie rod next to the jam nut and an open end wrench on the inner tie rod or the jam nut—if the nut is tight.
Press the trigger and turn the wrench to loosen the tie rods, but don’t loosen them too much.
Lastly, count how many turns it takes to remove the outer tie rod so you can put it back in the same spot—for alignment reasons.
Here’s a brief video version of the tie rod separator in action:
Conclusion
Although effective, heating your frozen tie rods to get them loose is also inefficient and harmful.
The Vibro Impact Tie Rod Separator is a top tool to loosen seized tie rods safely and quickly.
Share this post with your friends and colleagues and let them know the superiority of vibration over torches against seized tie rod connections.
Although effective, heating your frozen tie rods to get them loose is also inefficient and harmful.
The Vibro Impact Tie Rod Separator is a top tool to loosen seized tie rods safely and quickly. By the way, another suitable tool for doing tie rods is a wrench extender. We have an article explaining and proving why our wrench extender is the correct and safe way to add leverage instead of double wrenching.
If you enjoyed our content, share it with your friends and colleagues and tell them about the superiority of vibration over torches against seized tie rod connections.


