


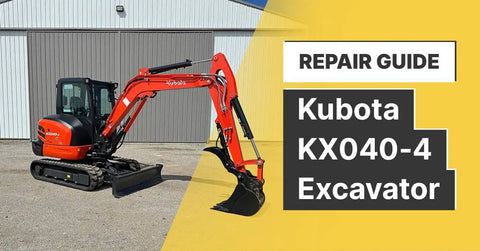
Kubota KX040-4 Mini Excavator Repair Guide
Written by
Updated On March 28, 2025
Featured Tools
+

3-5 Day FREE Shipping over $150 Call 855-702-2932 to order on the phone

Shop Quality Heavy Equipment Rubber Tracks
Premium rubber tracks to boost performance on any type of terrain
Shop AllShop Quality Heavy Equipment Undercarriage Parts
Top tier heavy equipment undercarriage parts to keep your machine in peak condition
Shop AllShop Quality Heavy Equipment Tools
Get the best quality heavy equipment Tools without the worry
Shop All

Written by
Updated On March 28, 2025
+
Photo source: www.machinerypete.com.
At Fortis, we want to make your heavy-duty tasks easier, whether with high-quality tools and replacement parts or by scavenging operator manuals, so you can have the info you need to troubleshoot thoroughly your piece of equipment.
If you want a professional technician to troubleshoot your equipment, visit Tekamo HD to hire a heavy-duty mechanic.

At Tekamo HD, we are committed to delivering unbiased, high-quality fleet repair and maintenance solutions designed to optimize efficiency, minimize downtime, and maximize value.
Tekamo HD is your One-Stop-Shop for Fleet Repair and Maintenance.

Photo source: www.mylittlesalesman.com.

Let’s start with the most straightforward solutions. Check the battery charge level and the position of the pilot control lock lever.
If the pilot control lock lever (identified as ① in the below image) is unlocked (pulled down), the machine will fail to start. Pull it up to the locked position.
Next, check the fuel condition. If viscous (due to wax crystalization or water contamination), it will struggle to flow through the system and clog filters, make the pump work harder, and cause poor injector atomization.
Since water is denser than fuel and will sit at the bottom of the tank, you can drain it using the valve inside the front compartment.
If, besides water, there are also impurities, drain the tank completely and refill it. The Kubota KX040-4 fuel tank capacity is 17 gal (64 L).
In either case, you may also need to change the filters.

Photo source: www.mylittlesalesman.com.
The fuel filters are in the back compartment. Here’s a step-by-step guide to change them both.

Photo source: www.youtube.com/@thirdhandearthworks.
First, to change the fuel filter, close the shutoff valve (pull it up) at the top of the water separator housing to stop the fuel flow.
Use some pliers to spin the filter clockwise to break it loose.
Lube the seal of the new filter with some fuel so it doesn’t bind as you tighten the filter. Don’t use tools to install the filter. Hand-tightening is more than enough. Our article “Why You Should Not Use A Tool To Tighten Up A Spin On Oil Filter” explains the reasons.
Bleed the air out of the system. Open the air bleed screw and turn the key to “run” until fuel flows out of the bleeder.

To service the water separator unit, open the drain plug until the cup empties and unplug the water level sensor. Remove the cup to replace the cartridge. Finish by reinstalling the cup and sensor, tightening the plug, and closing the shutoff valve.
The water level sensor might be a pain to unplug. So, you can take off the housing by removing the bolt next to the shutoff valve and the fuel lines at both sides of the housing (see image below). Loosen the cup before removing the housing.

The starting difficulties can also be due to air in the system. Check the fuel pipe joint bolts and nuts for looseness. Loose connections can cause air to be drawn into the system, especially when the fuel pump creates a vacuum.

| # | Item | # | Item | # | Item |
|---|---|---|---|---|---|
| 010 | TUBE, FUEL | 190 | TUBE, FUEL PIPING | 370 | BOLT M10x1.25x30 mm |
| 020 | TUBE | 200 | CLAMP | 380 | TRAY, ENGINE OIL |
| 030 | CLAMP, HOSE | 210 | FILTER, ASSY | 390 | TUBE, FUEL |
| 040 | SHUTOFF-VALVE | 220 | HOSE, FUEL | 400 | CLAMP |
| 050 | JOINT, PIPE | 230 | BOLT M10x1.25x80 mm BOLT M8x1.25x75 mm |
410 | BOLT M8x1.25x14 mm BOLT M8 X 1.25 X 16 mm |
| 060 | TUBE, FUEL | 240 | WASHER, M10 PLAIN WASHER, M8 PLAIN |
420 | TUBE, FUEL |
| 070 | TUBE, FUEL PIPING | 250 | HOSE, FUEL | 430 | CLAMP |
| 080 | CLIP, PIPE | 260 | TUBE, FUEL PUMP | 440 | CLAMP |
| 090 | TUBE, FUEL | 270 | TUBE, FUEL PIPING | 450 | TUBE, FUEL |
| 100 | TUBE | 280 | ADAPTER, T | 460 | CLAMP |
| 110 | CLAMP | 290 | CLAMP | 470 | BRACKET, WATER SEPARATOR |
| 120 | TUBE, FUEL | 300 | TUBE, FUEL | 480 | BOLT M8x1.25x20 mm |
| 130 | CLAMP | 310 | ASSY PUMP, (FUEL, BOOT) | 490 | VALVE, FUEL CHECK |
| 140 | CONNECTOR, HOSE JOINT, PIPE |
320 | ASSY PUMP, FUEL | 500 | BRACKET |
| 150 | BOLT M10x1.25x20 mm | 330 | BOOT, FUEL PUMP | 510 | BOLT M8 X 1.25 X 16 mm |
| 160 | JOINT, T FUEL PIPE | 340 | BOLT M6x1.0x16 mm | 520 | TUBE, FUEL |
| 170 | BOLT M8x1.25x16 mm | 350 | BOLT M8 X 1.25 X 16 mm | 530 | CLAMP |
| 180 | TUBE, FUEL | 360 | BRACKET, FUEL PUMP | - | - |
High-viscosity oil will cause the engine to run sluggishly during winter. Check your current oil specification and, if needed, drain and refill.
Use engine oil with an API service classification of CK-4 or CJ-4.
CK-4 is an improved version of CJ-4, offering better oxidation resistance, wear protection, and fuel economy. It is backward-compatible with CJ-4, meaning it can replace CJ-4 in most applications without issue.
If your engine requires CK-4, it’s best to stick with it rather than downgrade to CJ-4.
Use the following oil viscosities depending on the ambient temperature:
| Above 77 °F (25 °C) | SAE 30 or SAE 10W-30, SAE 15W-40 |
| 32 °F to 77 °F (0 °C to 25 °C) | SAE 20 or SAE 10W-30, SAE 15W-40 |
| Below 32 °F (0 °C) | SAE 10W or SAE 10W-30, SAE 15W-40 |

The air filter is in the right-side compartment. Besides the outer and inner filters, check the dust valve for caked dust and debris plugging it.
Once again, a low fuel level can be why your engine suddenly stops.
However, air in the fuel system can also be the reason, as it seems like the equipment is running out of fuel even when there’s fuel in the tank. Properly purge the fuel system following the abovementioned steps to fix this problem.
Poor quality fuel (contaminated or incorrect type that disrupts combustion efficiency) or overfilling the engine oil can cause this problem.
Here’s the general link between different abnormal exhaust gas colors on diesel engine vehicles and some of the problems causing them:
Start by checking the coolant level and fill to the prescribed level.
If, regardless of the correct coolant level, the problem persists, you might have the wrong coolant type (Mixing incompatible coolant types, use of tap water instead of distilled or deionized water, wrong water/coolant mixing ratio), or it may have already broken down.
The mixing ratios between water (distilled or deionized water) and anti-freeze based on the ambient temperature are:
| Ambient temperature |
ºF | +23 | +14 | +5 | -4 | -13 | -22 | -31 |
| ºC | -5 | -10 | -15 | -20 | -25 | -30 | -35 | |
| Antifreeze % | 30 | 30 | 30 | 35 | 40 | 45 | 50 | |
| Water % | 70 | 70 | 70 | 65 | 60 | 55 | 50 | |
In either case, drain the coolant and refill.
The coolant drain plug is near the engine oil plug, toward the rear of the machine.

If the old coolant is rusty, you should also check and clean the pipes of corrosion buildup, which reduces the flow of coolant and prevents efficient heat dissipation.
Other reasons for overheating related to the coolant system of your KX040-4 are:
Lastly, check if the radiator fins are clogged. Clean them using compressed air, a pressure washer, or a hose.
When using high compressed air or a pressure washer, step back from the radiator and don’t do it at an angle. Otherwise, you’ll bend the fins over, restricting the airflow. On the Fortis HD YouTube channel, you can watch an expert HD technician properly cleaning the fins of a radiator.
The problem might also be related to the engine system. A damaged head cylinder gasket leaking coolant or a low engine oil level will raise the engine’s working temperature.
On top of the above, wrong injection timing can cause overheating problems, especially retarded timing.
As Ronald Culberbone, a member of the Turbo Bricks forum, explains, “If the timing is too retarded the combustion event happens later in the cycle, and a lot of heat is wasted out of the exhaust port. Some are also transferred into the walls and head as well.”
Several solutions arise from this problem:

From dead blow hammers to top-tier ratchets, at Fortis HD, we want you to have the best heavy-duty tools to troubleshoot whatever comes up with your equipment.

The problem relates mainly to a low hydraulic oil level. Add oil and check for leakages from hoses or joins.
The hydraulic oil sight gauge is on the right side of the machine. Add oil until the level reaches the center mark of the gauge.
The following tables are the hydraulic oil recommendations according to the Kubota Tractor Corporation (KTC) and Kubota Canada Limited (KCL).
| KTC* - Hydraulic Oil Recommendations | |||
|---|---|---|---|
| Application | Viscosity | Kubota | Shell |
| In winter or low temperatures |
ISO 32 | Excavator hydraulic fluid 32 Part number 70000-68720 (5 Gal Pail) Part number 70000-68740 (55 Gal Drum) |
Shell Tellus S2M32 or Shell Tellus S2MX32 |
| In summer or high temperatures |
ISO 46 | Excavator hydraulic fluid 46 Part number 70000-68760 (5 Gal Pail) Part number 70000-68780 (55 Gal Drum) |
Shell Tellus S2M46 or Shell Tellus S2MX46 |
* KTC is the manufacturing and distribution company for Kubota in the United States, often referred to as just “KTC” by insiders and dealers.
| KCL* - Hydraulic Oil Recommendations | ||||
|---|---|---|---|---|
| Application | Viscosity | Kubota | Shell | Esso |
| In winter or low temperatures | ISO 32 | Kubota all-season hydraulic excavator oil Part number 70000-10200 (20 liters) |
Shell Tellus S2M32 or Shell Tellus S2MX32 |
Mobil DTE 13M |
| In summer or high temperatures | ISO 46 | Shell Tellus S2M46 or Shell Tellus S2MX46 |
Mobil DTE 15M | |
* KCL is the Canadian version of KTC in the United States. The two companies have their own tractor warehousing, parts distribution systems, and pricing.
If the swing motor and front attachment don’t work at all, check if the pilot control lock lever is in the “locked position.” Bring it down to the “unlock position” to reactivate the hydraulics.

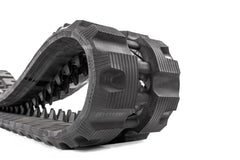
Clear the undercarriage from stones or debris blocking the mechanism or overstretching the tracks.
A noticeable difference in track tensions also causes this problem.
The recommended gaps for the KX040-4 excavator are:
Time to replace your Kubota KX040-4 rubber tracks? Visit Fortis HD to get the best value on tracks for your KX040-4 excavator with easy online ordering and next-day shipping across the United States.

When the auto idle system indicator light flashes without signs of malfunction (typically, you’ll see when the auto idle fails that it always goes up and down whether you touch the controls or not), the problem is a defective fuse.
Check if the ECU (+B) fuse is blown. The ECU (+B) fuse on the KX040-4 canopy version is #7, and on the cab version is #9.


We have prepared more repair guides to troubleshoot popular pieces of heavy equipment like the John Deere 35G and the 333G compact track loader.
Share this post with other heavy equipment owners and operators. You might be a click away from helping them figure out what’s happening with their Kubota mini excavator.